|
|
-
|
|
CAD
labs information: |
 |
-
Click
here for the CAD
Labs Schedule
-
Lab Contact
numbers (if you find the CAD
lab door locked when it should be open).
-
The "On
Duty" SA (Student Assistant) cell phone number: 509-859-4339
-
Jesse
Days (IS manager in charge of the campus computer labs) phone: 509-963-2989
-
Call me
if you find the labs closed and cannot contact anyone else.
-
Click
here for 3D
Printer Procedures
|
|
-
|
|
SolidWorks
for Students: |
 |
|
|
-
|
|
SW
Related Web Links: |
 |
Below
are links to various SolidWorks informational and demonstrative websites
and similar online resources:
|
|
-
|
|
Instructional
Links: |
 |
The
following are links explaining the first and third angle projections:
The following
is a list of Websites and resources for use in your Gear Design Project:
The following
is a list of Websites and resources for use in your Geometric Dimensioning
and Tolerancing (GD&T) Projects:
|
|
-
|
|
Drawing
Guidance: |
 |
The
following are tips on getting a decent grade on your drawings for your
design assignments.
-
The premise
here is to make your drawings as neat and as readable as possible eliminating
errors and ambiguity.
-
Remember,
in the real world, mistakes and ambiguity cost time and money.
-
In this
class these mistakes will impact your grade.
-
Always
present your best work, fix your own mistakes!
-
Double
check your work before giving it to others.
-
Check
it on screen first
-
If any
errors are found correct them before printing
-
Check
the printed copy second
-
If any
errors are found make the corrections then reprint.
-
If I find
these mistakes and mark up your work, it will affect your grade.
|
|
-
|
|
Generallized
Grading Criteria for Drawings: |
 |
Generalized
Grading Criteria for Drawings:
The
list below may be modified as the quarter progresses:
Appearance:
-
Center
your drawing views in the drawing area so that it fills the page without
over crowding or leaving excess space.
-
Try to
provide equal spacing between your drawing views and the top and bottom
of the page as well as from the left and right.
-
This includes
drawn objects as well as notes and dimensions.
-
The spacing
from the drawing views and the border of the drawing should be about the
same as the between each of the drawings views both horizontally and vertically.
-
Dimension
your drawing views according to conventional standards
-
Move dimensions
around to avoid "crowding"
-
Dimensions
referencing the same feature such as a linear pattern, should be grouped
together.
-
Include
the word "TYPICAL" following dimensions that apply to similar items in
the same view such as similar sized holes, fillets, chamfers or row and
column offsets.
-
The isometric
view should have no dimensions in it.
-
Properly
fill in your title block, with CAPITALS only.
-
Provide
an appropriate sheet scale (a scale that applies to every view in your
drawing):
-
Use standard
scales such as
-
Metric:
1:1, 1:2, 1:5, 1:10 and similar multiples of 2, 5 and 10.
-
SAE: 1:1,
1:2 (6" = 1'-0"), 1:4 (3" = 1'-0"), 1:6 (2" = 1'-0"), 1:8 (1-1/2" = 1'-0"),
1:12 (1" = 1'-0"), 1:16 (3/4" = 1'-0") and similar multiples of 2,4 and
8.
-
Automatic
scales added by SolidWorks may include 1:3, 1:7. 1.5:1 and other non traditional
scales, these need to be modified to standard scales.
-
Label
each view with its own scale if it is different from the sheet scale.
-
The isometric
view should have no scale label on it.
-
Provide
a proper View Title, in CAPITALS with UNDERLINED TEXT.
-
Position
the View Title centered under the drawing view with a small offset.
-
The View
Title should have the following information answered in the following order
top to bottom, what is it? what view is it? what scale is it (if different
from the sheet scale)? and any note references that apply to that view
in brackets like :(NOTE 3)
-
Label
each view with its own scale if it is different from the sheet scale.
Avoid
duplicate or redundant information, this leads to ambiguity.
|
|
-
|
|
Printing
Procedures: |
 |
The
following are procedures on using the printers and plotter in the CAD Lab.
ALL
drawings are to be printed in grey scale or black and white with the exception
of the Cover Sheet Only.
-
ALL
DRAWINGS USE THIS PRINTER: All drawings printed in grey scale (except
Cover Sheet)
-
Save SolidWorks
drawing file to a full size color pdf then print the pdf per the settings
below:
-
Printers
93799 or 99251 - or similar printer
-
Full size
in color or grey scale (grey scale option usually chosen by default on
black and white printers)
-
Tabloid
size (ANSI B - 11 x 17)
-
Check
your scale with an engineers scale, then trouble shoot settings as needed
-
Cover
Sheet in color (and whatever drawing you want in color).
-
Save SolidWorks
drawing file to a full size color pdf, print the pdf per the settings below:
-
HP Plotter
-
Full size
in color
-
Tabloid
size (ANSI B - 11 x 17)
-
Trim on
paper cutter as needed
-
Check
your scale with an engineers scale, then trouble shoot settings as needed
-
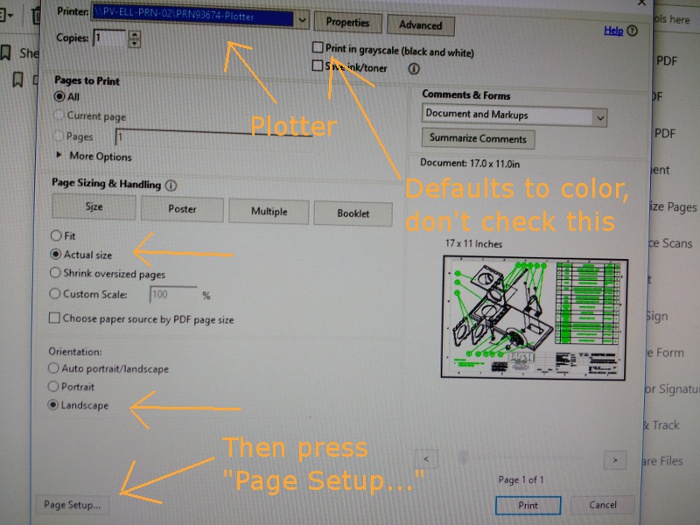
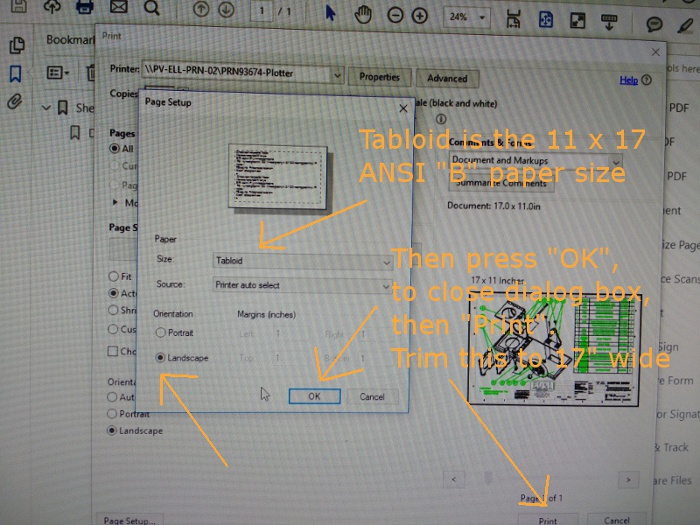
Choose
the settings in the images below to print a pdf drawing full size in color


|
|
-
|
|
Assignment
Redos: |
 |
All
work re-submitted for re-grading must include the markup (graded sheet
from the previous evaluation) either submitted at the instructor's computer
or scanned and emailed. I will grade comparing the new work with
the markup to ensure that the corrections marked have been addressed.
Without a markup, resubmitted work will not be considered for re-grading.
|
|
-
|
|
Random
Number: |
 |
|


