|
|
|
-
|
|
 |
 |
-
| Week
1:
Announcements:
Come
to the first class of Week 2 prepared by modeling the Class Design Projects
listed in this section below.
Link
to Wednesday's Power Point Presentation named
A
Short History of CAD, Computer Aided Design.
Books,
Two total maybe, you will also learn about SolidWorks through video tutorials.
The
Ultimate GD&T Pocket Guide

Available
at the bookstore
|
Engineering
Design Using SolidWorks (maybe)

Available
on
Amazon
|
d
Getting
Started:
Download
your SolidWorks software, the SolidWorks Student Edition, check the links
and procedures on the Student
Resources web page. Every student enrolled in a SolidWorks course
can download a student version of the software for thier own personal use,
with limitations of course.
And as
a backup, and for your convenience, the CAD
Lab is available everyday except for Saturdays.
This
week's videos can be found on the Instructional
Video Page in the Week 1 section. Week 1 means that you need
to view, practice and understand these videos before the start of Week2.
Below
is a section describing your Class Design Project for this week.
By the beginning of Week 2 have the Week 1 Class Design Project completed
and ready to send in.
Think
about your Final
Design Project, it will serve as your final evaluation for the quarter.
And its a design of your choosing (within reason). Submit a Final
Design Project Proposal at the beginning of class on Wednesdy of Week 2.
Click on the above link for more information.
There
will be a Weekly Design Evaluation (WDE) on Wednesday of Week 2 based on
Week 1's Instructional Video content and the Class Design Projects listed
below.
|
In
Class Demonstrations:
Week 1
- Class Design Projects (click on the linked images below):
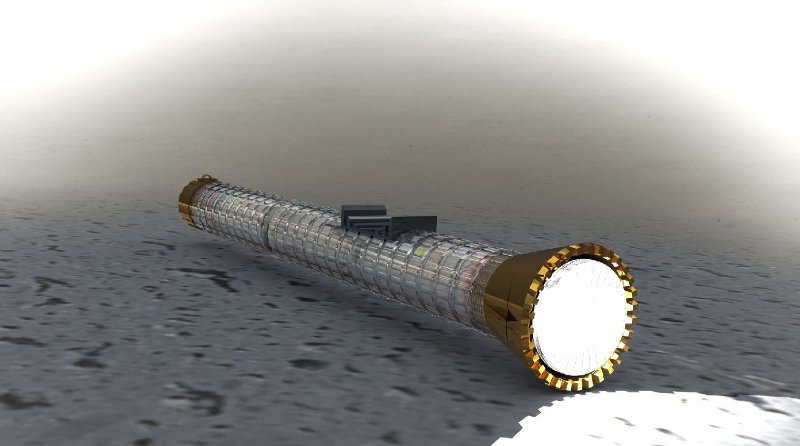
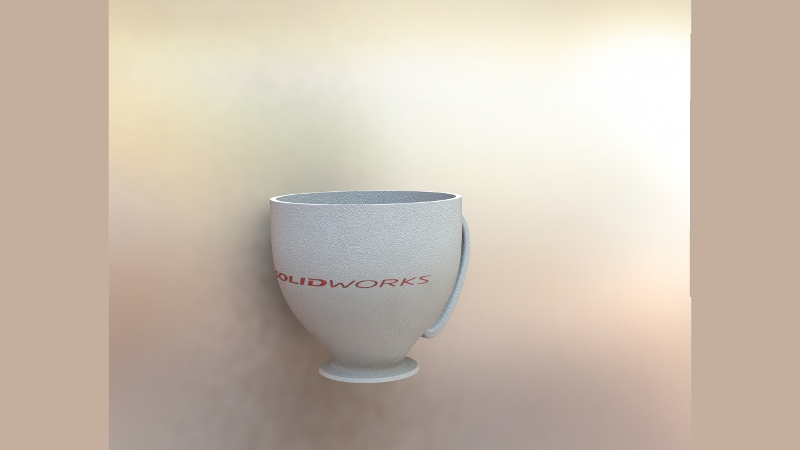
-
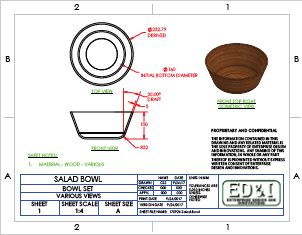
Salad Bowl
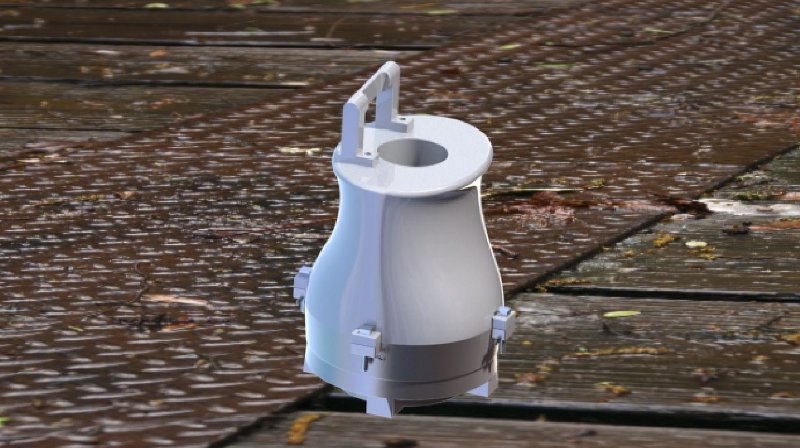
-
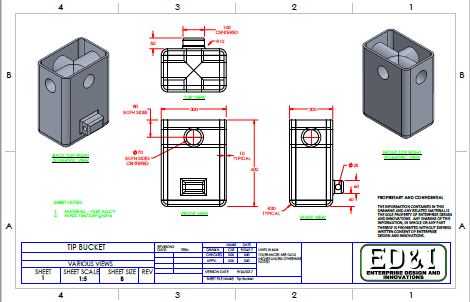
Tip Bucket
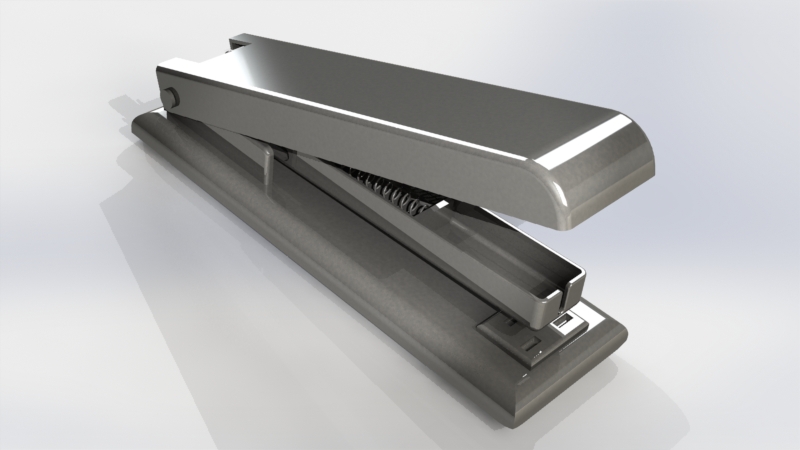
-
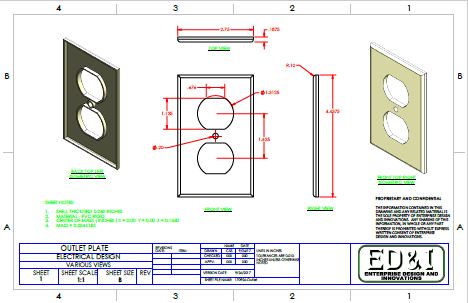
Outlet Plate
Week
1 Instructional Videos, click here
-
|
|
-
|
|
 |
|
-
| Week
2:
On Friday
I will return your graded WDEs. We will also go over the gradesheet
and the Oulet Plate model as a step by step exercise.
By the
end of Week 2, you will have viewed and practiced the Instructional Videos
available so far and have the Week 2 Class Design Projects completed and
ready for evaluation.
A new
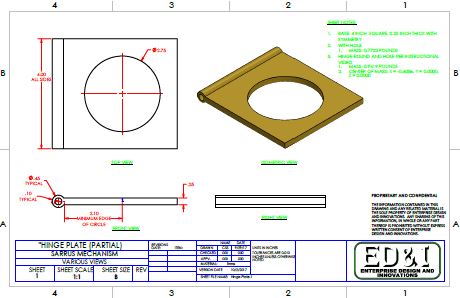
Hinge Plate drawing has been uploaded have this model ready by your WDE
on Wednesday of Week 3.
|
-
Weekly
Design Evaluation (WDE) details (Wednesday - 4 items):
-
Terminology Comprehension Section
(TCS) (short answer, multiple choice, True False questions) (20pts)
-
Class Design Section (CDS) (20pts)
-
Part 1 (10pts) one of the parts
from last week's Class Design Projects
-
Material, Completeness with
symmetry (1pts)
-
Orientation (1pt)
-
Fully defined sketches with
dimensions (2pts)
-
Extrude, Feature Fillet, Shell,
Extrude Cut for holes (1pt each)
-
Mass and Center of Mass (Hint,
Extrude blind for direction to toward the front, not the Mid Plane) (2pts)
-
Extras and errors
-
Part 2 (10pts) new part to be
modeled in class
-
Units millimeters, Material
(1pt)
-
Completeness with symmetry,
origin on the Front Plane (direction toward the back), Right and Top Planes
in the center (2pts)
-
Fully defined sketches with
dimensions (2pts)
-
Rename your Extrude Boss/Base
Features to Base 1 and Base 2 Cut Extrudes to Side Holes and Vertical
Holes (Hint, cut these holes from the Right and Top Planes, Through All
Both) (1pt)
-
Extrudes (4), Feature Fillet,
Shell, Extrude Cut for holes (4) (2pts)
-
Mass and Center of Mass (see
drawing) (2pts)
-
Extras and errors
-
Final Design Section (FDS) (10pts)
-
Final Design Project Proposal,
due at the beginning of class on Wednesday - or before class via email.
Week 2
- Class Design Projects (click on the linked images below): more
information will follow soon including new videos.
Topics
this week include:
-
Fake (alternative)
Template Files,
-
Different
Sketch Tools including the 3 point arc, tangent arc, centerpoint arc, center
of circle on line (tangent) collinear sketch relation, angle lines and
dimensions. Command Manager customize option,
-
Features:
Hole Wizard.
-
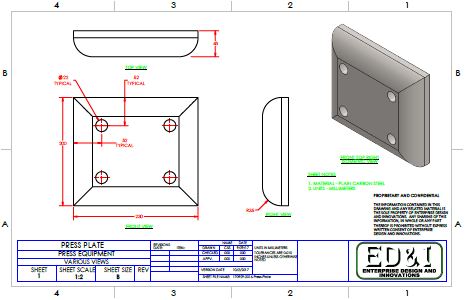
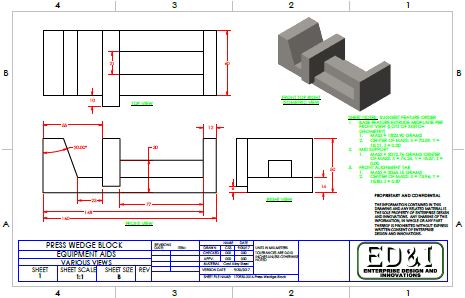
Press Plate
-
-
Press Wedge Block
-
-
Schmet's Hook
-

-
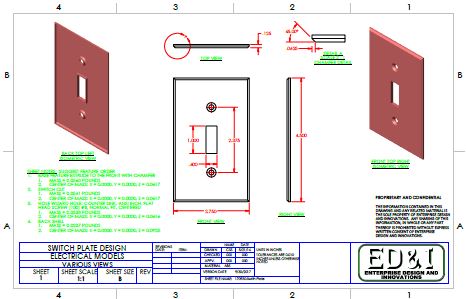
Switch Plate
-
-
In Class - Hinge Plate
-
Week
2 Instructional Videos, click here
-
|
|
-
|
|
 |
|
-
| Week
3:
On Friday
we will review our second WDE.
Most
of the class did not do well on the Schmet's Hook project, so we will go
over that again in class on Friday. Also, as a class exercise, I
will examine and fix every student file on the hook so I can show you how
to use best practices to get the correct mass properties. This will
provide you the opportunity to hand in a corrected model for re-evaluation
by Monday's deadline.
|
-
Weekly
Design Evaluation (WDE) details (Wednesday - 4 items):
-
Terminology Comprehension Section
(TCS) (short answer, multiple choice, True False questions) (20pts)
-
Class Design Section (CDS) (10pts)
-
Part 1 (10pts) one of the parts
from Week 2's Class Design Projects
-
Units, Material (1pt)
-
Origin at bottom, Front Plane
Extrude forward (1pt)
-
Fully defined sketches with
dimensions (1pt)
-
Features (1pt)
-
Hole Wizard (2pts)
-
Mass and Center of Mass (4pts)
-
Extras and errors
-
Part 2 Clip Roller (20pts) new
part to be modeled in class
-
Units inches, 4 numerals after
decimal (1pt), Material (1pt)
-
Origin at the center of the
circle, Right Plane (Mid Pane Extrusion) (1pt)
-
Fully defined sketches with
dimensions (2pts)
Features: Extrudes (3pts),
Mirror (1pt), Feature Fillet (1pt), Chamfers (2pts) Hole Wizard (2pts)
-
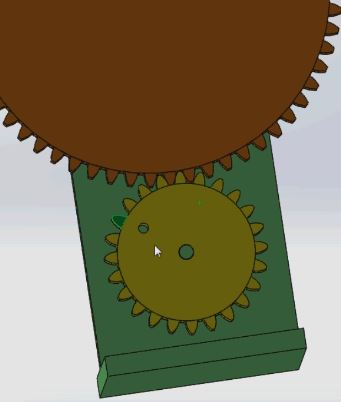
Rename your features, see image
to the right for suggested feature order (2pts)
-
Mass Center of Mass (see drawing)
(4pts)
-
Extras and errors
-
Final Design Section (FDS) (10pts),
Final Design Project (FDP) start your first part.
-
Material (2pts)
-
Orientation, Symmetry (1pt)
-
Fully defined sketches with
dimensions (2pts)
-
At least 4 Features or a complicated
sketch (4pts)
-
Rename your Features (1pt)
Week 3
- Class Design Projects (click on the linked images below):
-
Sarrus Base Plate
-

-
Sarrus Pin
-

-
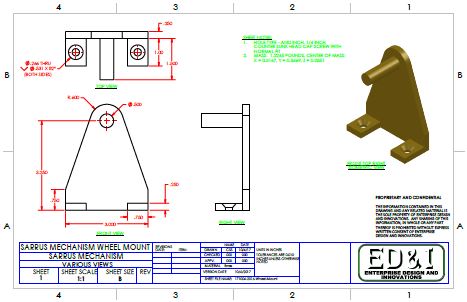
Sarrus Wheel Mount
-
-
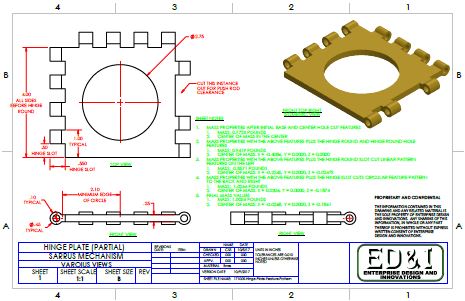
Sarrus Hinge Plate
-
Week
3 Instructional Videos, click here
-
|
|
-
|
|
 |
|
-
| Week
4:
For next
week's WDE - practice with the Instructional Videos from Week 4 at the
link below. There are various videos on the revolved, loft and sweep
features. After the videos you will have that specific part completed
for the week.
Continue
to progress on your FDP. You should have either last week's 3 parts
with now an average of 7 features each, or 4 parts with an average of 5
features each or 5 parts with an average of 4 features each. These
will be evaluated during Week 5's WDE.
|
-
Weekly
Design Evaluation (WDE) details (Wednesday - 4 items):
-
Terminology Comprehension Section
(TCS) (short answer, multiple choice, True False questions) (20pts)
-
Class Design Section (CDS) (20pts)
-
Part 1 (10pts) one of the parts
from Week 3's Class Design Projects
-
Modify the elements of the part
(1pt)
-
Units inches, 4 numerals after
decimal, Material (1pt)
-
Origin location, Correct plane
(extrude mid plane) (1pt)
-
Fully defined sketches with
dimensions (1pt)
-
Modify length and width (1pt)
modify Linear Pattern (1pt)
-
Suppress feature - Mass Center
of Mass (4pts)
-
Extras and errors
-
Part 2 - Postion Guide (20pts)
new part to be modeled in class
-
Units millimeters, 2 numerals
after decimal (1pt), Material (1pt)
-
Origin at the center of the
knob, correct plane (extrude up) (1pt)
-
Fully defined sketches with
dimensions, model integrity (3pts)
-
Features: Extrude (1pt), Extrude
Cut (1pt), Linear Feature Pattern (1pt) Extrude Cut (1pt), Hole Wizard
(2pts), Extrude Cut (1pt), Revolved Boss/Base (1pt)
-
Rename your features, see image
to the right for suggested feature order (2pts)
-
Mass, Center of Mass (see drawing)
(4pts)
-
Extras and errors
-
Final Design Section (FDS) (30pts),
Final Design Project (FDP) create 2 more parts (3 total)
-
Material, model completeness,
orientation, symmetry (if needed) (3pts)
-
Fully defined sketches with
dimensions (2pts)
-
At least 4 Features (4pts)
-
Rename your Features (1pt)
-
Errors and Extras
Week 4
- Class Design Projects, click on the linked images below:
-
Sarrus Wheel
-

-
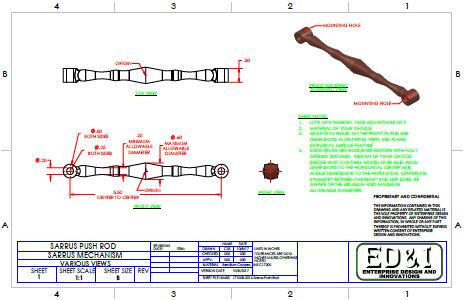
Sarrus Push Rod
-
-
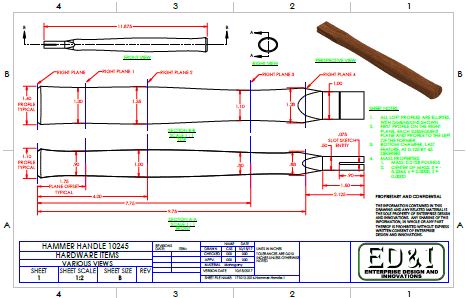
Hammer Handle
-
-
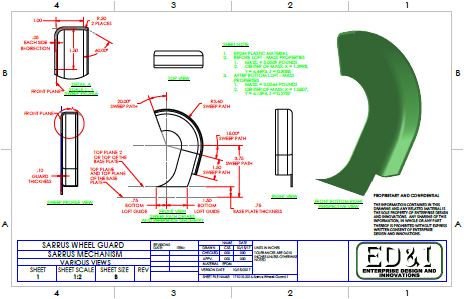
Sarrus Wheel Guard
-
Week
4 Instructional Videos, click here
|
|
-
|
|
 |
|
-
| Week
5:
Videos
and files for this week will concentrate on SolidWorks Assemblies.
Please view the content below. For the Hammer Assembly, click on
the image to download the Hammer Head part that will compliment your Hammer
Handle in making your Hammer assembly.
Continue
to progress on your FDP. We will be looking for your FDP assembly
as a portion of the Week 6 WDE.
|
-
Weekly
Design Evaluation (WDE) details (Wednesday - 4 items):
-
Terminology Comprehension Section
(TCS) (short answer, multiple choice, True False questions) (20pts)
-
Class Design Section (CDS) (20pts)
-
Part 1 (10pts) one of the parts
from Week 3's Class Design Projects
-
Modify the elements of the part
(1pt)
-
Units inches, 4 numerals after
decimal, Material (1pt)
-
Origin location, Correct planes
(1pt)
-
Fully defined sketches with
dimensions, model integrity (1pt)
-
Mass Properties
-
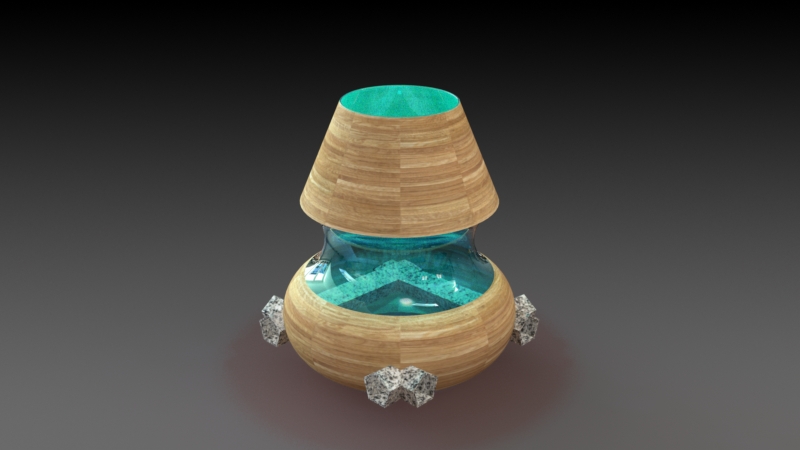
Part 2 - Crucible Bucket (20pts)
new part to be modeled in class
-
Units inches, 2 numerals after
decimal, Material (1pt)
-
Fully defined sketches with
dimensions, model integrity (3pts)
-
Features: Lofted Boss/Base (2pts),
Swept Boss/Base (2pts), Revolved Boss/Base (2pts), Three Planes (3pts),
Split Line (1pt), Mirror (1pt)
-
Rename your features, see image
to the right for suggested feature order (2pts)
-
Mass, Center of Mass (see drawing)
(3pts)
-
Extras and errors
-
Final Design Section (FDS) (30pts),
Add more parts or add more features to existing parts (each part gets two
points) and each average feature gets one. Multiply these values
together and add them up to receive a total score of 40 points (proportionally
rounded up), the more stuff the more points.
-
Material, model completeness,
orientation, symmetry (if needed) (20% off each)
-
Fully defined sketches with
dimensions (20% off each)
-
Descriptive Part Name, Rename
your Features (10% off each)
-
Errors and Extras
Week 5
- Class Design Projects, This week we are concentrating on Assemblies.
Clicking on the images below will take you to the Week 5 Instructional
Video page where you can follow a step by step apporach to building these
assemblies.
-
The Sarrus Mechanism Assembly
-
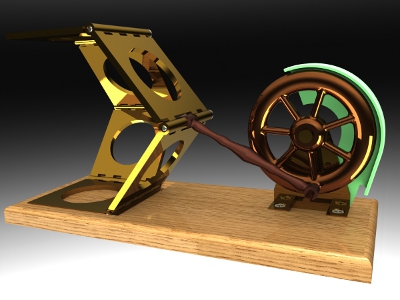
-
The Sarrus Hinge Plate
with Configurations

Week
5 Instructional Videos, click here
-
|
|
-
|
|
 |
|
-
| Week
6:
For this
week's WDE, check the information below.
This
week and next we will focus more on assemblies and your FDP assembly and
parts. Check back for updates.
As a
reminder we will not have class on Friday of Week 6, but continue to progress
on your FDP. Contact me if you need help.
|
-
Weekly
Design Evaluation (WDE) details (Wednesday - 4 items):
-
Terminology Comprehension Section
(TCS) (short answer, multiple choice, True False questions) (20pts)
-
Class Design Section (CDS) 40
points total
-
Out of Class Project The Sarrus
Assembly (20pts)
-
Standard ANSI Inch, 3 units
after the decimal (3pts)
-
Base Plate fixed to the Origin
(2pts), planes coordinated (2pts)
-
Wheel Mount Fully Defined and
mated in Slot (1pt)
-
First Hinge Plate Fully Defined
and mated in Slot (1pt)
-
Hinge Plate Form (Configurations)
(2pts)
-
Remaining Hinge Plates, five,
with flexibility (1pt)
-
Pins defined, six, mated in
Hinge Holes (2pts)
-
Wheel defined with rotation
(1pt)
-
Wheel Guard Fully Defined (1pt)
-
Toolbox Machine Screws, two,
Fully Defined (2pts)
-
Appropriate Motion (2pts)
-
Extras and errors
-
In Class Project The Hammer
Hanger Assembly (see instructions) (20pts)
-
Hammer Hanger Plate:
-
Standard ANSI Inch, 3 units
after decimal (1pt), AISI 316 Stainless Steel Sheet (1pt), Rename your
features (1pt), Model complete, Mass Properties (2pts)
-
Hammer Hanger Hook:
-
Standard ANSI Inch, 3 units
after decimal (1pt), AISI 316 Annealed Stainless Steel Bar (1pt), Rename
your Sketches, Planes and Features (2pts), Model complete, Mass Properties
(2pts)
-
Hammer Hanger Assembly:
-
Hammer Hanger Plate Fixed to
the Origin (2pts)
-
Hammer Hanger Hook, Coincident
Mate - Right Plane to the Right Plane of the Assembly (1pt), Concentric
Mate - circular surface to circular surface of the Hanger Plate (1pt),
Parallel Mate Front Plane to the Front Plane of the Assembly (1pt).
-
Insert Hammer Sub-Assembly (look
for Assembly files) (1pt), Rotate sub assembly approaching proper orientation
(1pt)
-
Hammer Coincident Mate Front
Plane to Right Plane of Assembly or Hook, (1pt), Distance Mate between
top of handle and Top Plane of Hook of 1.1 inches (1pt), Distance Mate
between the Top Plane of the Hammer and the Front Plane of the Hook of
1.0 inches (1pt).
-
Before you send the file, unsupress
the Parallel Mate (2pts) - the hammer and hook should swing.(2pts)
-
Extra credit for a Limit Mate
on this mate
-
Weekly Design Evaluation - Week
6 - Final Design Section - 20 Points
-
Appropriate part fixed to the
Origin (5pts)
-
Planes coordinated (5pts)
-
Appropriate Mates (6pts)
-
Provide some sort of motion
(4pts)
-
Hole Wizard Holes and Toolbox
Fasteners (extra credit this week, required next time)
-
Material, model completeness,
orientation, symmetry (if needed) (20% off each)
-
Fully defined sketches with
dimensions (20% off each)
-
Descriptive Part Names, Rename
your Features (10% off each) Errors and Extras
Week
6 Instructional Videos, click here
-
|
|
-
|
|
 |
|
-
| Week
7:
On Friday
we will take your homework from Wednesday, and with the various values
derived, we will design your Spur Gear pairs as a portion of your Spur
Gear Design project. Review information on the Student
Resources Page for the Spur Gear Design. A video with details
is also available in the Week
7 Instructional Video page. This project will count toward your
Week 8 WDE.
MTerminolgy
on Spur Gear Design will be a part of the TCS of the WDE in Week 8.
More
information coming soon.
|
-
Weekly
Design Evaluation, none this week.
Week
7 - Class Design Projects, This week we are working on your FDP Parts and
Assemblies and the Spur Gear design project.
-
Spur Gear Design Project formulas,
as described on Wednesday, solve these before class on Friday, click on
the image below for a printout. Go to the Week 7 Instructional Video
page for additional information.
Week
7 Instructional Videos, click here
-
|
|
-
|
|
 |
|
-
| Week
8:
This
week's WDE will be on Monday, in short you will need the following:
-
Spur Gear
Assembly (completed in class on Friday)
-
Modifications
to the Spur Gears (in class on Monday)
-
FDP progress,
check your score on the Grade Sheet (send before class on Monday)
-
A Rib and
Design Table on one of your FDP parts (send before class on Monday)
For the
TCS, know about the 5 Display Styles, at least 6 Mate types, and be able
to describe the "6 Degrees of Freedom" in an assembly.
For details,
check the information below. |
-
Weekly
Design Evaluation (WDE) details for Monday 11/6/17 - 4 items:
-
Terminology Comprehension Section
(TCS) (short answer, multiple choice, True False questions) emphasis on
Assemblies and gear terminology (20pts)
-
Class Design Section (CDS) 60
points total
-
Out of Class Project The Spur
Gear Design Project (40pts)
-
Standard ANSI Inch, 4 units
after decimal (1pt), Material of your choice (1pt), Rename your features
(1pt), Model complete (3pts)
-
Properly derived Do, Dp, Dr,
(2pts each gear)
I
-
Dpp, Db (2pts each gear)
I
-
Ta (2pts each gear)
I
-
Tooth Root Perpendicular (2pts
each gear)
I
-
Xc (2pts)
-
Movement with Physical Dynamics
(10pts)
-
Gear Mate, works correctly (6pts)
-
Extras and Errors
-
In Class Project Gear Modifications
(20pts)
-
Take a screenshot of a spur
gear design and emulate it...
-
Weekly Design Evaluation - Final
Design Section - 30 points total
-
FDP Project - (30pts)
-
Total score, per the Grade Sheet
"WDE FDS" tab, of 30 points. See the video linked on the Week 7 Instructional
Video page for how this is graded.
-
Material, model completeness,
orientation, symmetry (if needed) (10% off each part)
-
Fully defined sketches with
dimensions (10% off each part)
-
Descriptive Part Names, Rename
your Features (10% off each part)
-
Errors and Extras
-
FDP Part modifications 20 points
total
-
Design Table (10pts)
-
Pick a FDP part and include
a Design Table per the video in the Week 7 Instructional Video Page (1pt)
-
Must have at least 6 Excel generated
configurations with variations on dimensional values (6pts)
-
3 Excel generated derived configurations
to suppress or unsupress a feature (3pts)
-
More configurations for extra
credit (0.5 pts each)
-
Rib Feature (10pts)
-
Pick a FDP part and include
a Rib Feature per the video in the Week 7 Instructional Video Page, must
be properly defined (10pts)
-
Week 8
- Class Design Projects, This week we will be initiating SolidWorks Drawings.
More information coming soon.
-
Information on making a selection
for the SolidWorks toolbar, application or function that you wish to demonstrate
to the class as a portion of your FDP presentation during the class final.
(click on the image for more information)
-
Drawing of the modifed Sarrus
Wheel Mount (coming in class)
Week
8 Instructional Videos, click here
-
|
|
-
|
|
 |
|
-
| Week
9:
This
week's WDE will be on Friday, details in the section below.
This
week we will be focused on SolidWorks Drawings
|
-
Weekly
Design Evaluation (WDE) details for Friday 11/17/17 - 4 items:
-
Terminology Comprehension Section
(TCS) (short answer, multiple choice, True False questions) emphasis on
Drawings and Assemblies (20pts)
-
Class Design Section - 60 points
total
-
Out of Class Project - 10 points
total
-
Drawing Template Title Block
Items (from your printed Sarrus Wheel Mount drawing below
-
Looks complete (1pt)
-
Company name filled in and within
in border (modify text size)(1pt)
-
File name fits (modify text
size)(1pt)
-
Unless Otherwise Specified section
filled in properly (1pt)
-
Interpret Geometric Tolerancing
section filled in properly (1pt)
-
Logo, effort, unique, (2pts)
fills the box, company name, address, phone number, web address (2pts)
-
Proprietary section filled in
(1pt)
-
In Class Project Sarrus Wheel
Mount Parts, part Modifications, Assembly and Drawing - 60 points total
-
Sarrus Wheel Mount Sub-Assembly
with new parts and modified parts - 20 points total
-
Open your Sarrus Wheel Mount
part and make the following modifications and create some new parts:
-
....
-
New Sarrus Wheel Mount: Material,
Mass Properties
-
Create a new part...
-
Create a sub-assembly...
-
Appropriately defined
-
Send Pack and Go of assembly
-
Sarrus Mechanism Assembly -
Revised - 20 points total
-
Suppress the Wheel Guard
-
Create an inside washer to be
placed between the Sarrus Wheel and the Sarrus Wheel Mount Sub-Assembly
named Sarrus Wheel Mount Washer using existing model geometry
-
Create a new configuration of
this part for the outside washer with a 1/8" cotter pin hole in it.
-
Provide a corresponding hole
on the Sarrus Wheel Mount Pin part designed above
-
Insert the Sarrus Wheel Mount
Assem, in lieu of the Sarrus Wheel Mount part, and fully define this assembly
to the Sarrus Mechanism Assembly
-
Download a 1/8" cotter pin from
3D Content Central from Rhodes Wilkinson
-
Insert the washers and cotter
pin in the appropriate locations, fully defined
-
Make certain that all parts
in the assembly are appropriately defined
-
Sarrus Wheel Mount Drawing -
20 points total
-
Drawing
-
3 standard views (HLR), isometric
view (Shaded), section view of the Front View positioned to the
right of the Right View (HLV), detail view of the Top View of the Hole
Wizard Hole
-
View Titles labeled, centered,
proper layer
-
Views centered with consistent
offsets,
-
Dimensions, complete, proper
layer, dimension leader offsets
-
Hole Wizard callout on a detail
view
-
Note section with fabrication
details and Mass Properties - Mass and Center of Mass
-
Print this on ANSI B sized paper
-
Weekly Design Evaluation - Week
9 - Final Design Section - 60 points total
-
Name of the toolbar, application
or function that you wish to demonstrate (10pts):
-
FDP Project - (50pts)
-
Total score, per the Grade Sheet
"WDE FDS" tab, of 50 points. See the video linked on the Week 7 Instructional
Video page for how this is graded.
-
Fully defined sketches with
dimensions (not counted if not fully defined)
-
Descriptive Feature names (10%
off each part)
-
Descriptive Part Names, material,
orientation, symmetry (if needed) (10% off each part)
-
Mated not intersecting parts,
parts not fully defined when they should be (10% off each part)
-
Errors and Extras
-
Weeks
9, 10 and 11 - Class Design Projects, This week we will be working more
with SolidWorks Drawings including Explode Configurations, Explode Drawing
Views, BOMs (Bill of Materials) and Balloons.
-
Week
9 Instructional Videos, click here
-
|
|
-
|
|
 |
|
-
| Week
10:
This
week's WDE will be on Monday, the Revolved Features project and contest.
Come to class with a modeled project per the criteria below. We will
work on PhotoView 360 in class on Monday. There will be no TCS or
FDS section on the WDE. Contest winners will get up to 20 points
extra credit.
|
-
Weekly
Design Evaluation (WDE) details for Monday 11/20/17 - 2 items:
-
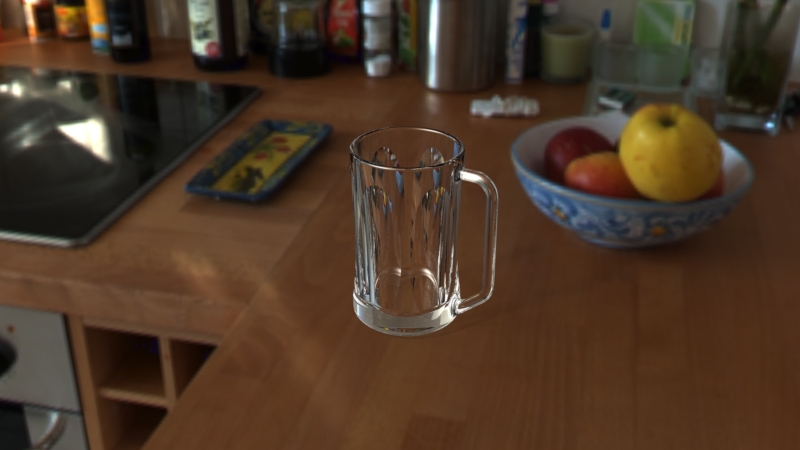
Class
Design Section - 20 points total, Create a revolved feature part similar
to the wine glass demonstrated in Video 23 on the Week
3 Instructional Video page. It can be any object that can be
produced using a revolved feature such as, but not limited to, a vase,
candle stick holder, coffee cup or mug, jar, bottle, lighting fixture,
drinking glass, dinner plate, etc
look around, find something that can
be modeled - measure it and create it.
-
Revolved
feature part 20 points total
-
Must contain:
lines arcs and a style spline and multiple features if desired (3pts)
-
At least
30 sketch entities in the primary and one other feature including model
lines, arcs, style splines, reference geometry, and dimensions (6pts)
Extra credit for more.
-
Fully
defined sketches (3pts)
-
Descriptive
part name (2pts)
-
Renamed
features (2pts)
-
Symmetry
(1pt)
-
Material
or Appearance (2pts)
-
Color
(1pt)
-
Errors
and Extras
-
Send part
-
Photo
real image using PhotoView 360 20 points total
-
Material
(4pts)
-
Scene
(2pts)
-
Lights
(2pts)
-
Camera
(3pts)
-
Object
fills image (2pts)
-
Object
centered in image (2pts)
-
Good orientation
(1pt)
-
Image
size 800px x 450px or 600px x 1067px (3pts)
-
Errors
and Extras
-
Send image
Weeks
9, 10 and 11 - Class Design Projects, This week we will be working more
with SolidWorks Drawings including Explode Configurations, Explode Drawing
Views, BOMs (Bill of Materials) and Balloons.
-
-
Information on some general
guidlines for your Final Design Project presentation. click on the
image for more information)

-
Week
10 Instructional Videos (week 9 continued), click here
-
|
|
-
|
|
 |
|
-
| Week
11:
This
week's WDE will be on Wednesday evaluating a preliminary set of drawings
of your Final Design Project. Plus the usual TCS. Details below.
WDE drawings are due Friday before class, printing during class will result
in a 10% markdown.
Procedures
for printing your Cover Sheet in color will be posted soon.
|
-
Weekly
Design Evaluation (WDE) details for Wednesday 11/29/17 - 4 items:
-
Class
Design Section - 40 points total
-
Generalized
grading criteria for all drawings include:
-
B size
to a pdf file in color (send pdf), then print the pdf in the lab in grey
scale, full size (measure this), (color for Cover Sheet), ANSI dimensioning
standard, units, appropriate precision, appropriate sheet scale, views
laid out with appropriate spacing and symmetry.
-
Title
Block items as described throughout the quarter, all CAPITALs, logo (unique
with company information), part description, file name, company name, units
of measure, dimensioning standard, confidentiality statement (filled in
with your company name), material, drawn by (your initials) and date, checked
by and date, etc
-
Specific
Grading Criteria:
-
Drawing
Template of your FDP - Title Block Items and Drawing Layout (random part
drawing selected) 10 points total.
-
All CAPITALs
(1pt)
-
Logo -
effort, unique, (1pt) fills the box, company information including: name,
address, phone number, web and email address (1pt)
-
Company
name section (1pt)
-
Part description
section (1pt) file name section (fits) (1pt)
-
Material,
Weight, Units of measure sections (1pt)
-
Drawn
by (initials) and Draw date - todays date (1pt)
-
Interpret
Geometric Tolerancing section (1pt)
-
Dimensioning
standard, Confidentiality statement section (1pt)
-
Errors
and Extras
-
Cover
Sheet drawing of the assembly of your FDP, graded as follows - 10 points
total
-
Image(s)
of the assembly or an important part of the assembly (will check the assembly
for the items below when grading the final)
-
Material
on parts in the assembly (1pt), Scene (1pts), Lights on (1pt), Camera (1pt)
-
Object
fills image (1pt), Object centered in image (2pts)
-
Aspect
ratio 16:9 (1pt)
-
Errors
and Extras
-
Part drawing
(1) of your choice from your FDP, graded as follows - 10 points total
-
ANSI dimensioning
standard, units, appropriate precision, appropriate sheet scale (1pt)
-
3 standard
views with at least 2 Display Styles (1pt)
-
Isometric
view with Shaded or SWE Display Styles (1pt)
-
2 extra
views choosing from the Detail View, Projected View, Section View, Crop
View or others, has to add to the information attempting to be demonstrated
with your project (1pt)
-
Dimensions
complete, organized, extension line offsets, Dimension layer 10 minimum
(1pt), 2 different types of tolerances on the appropriate features on your
parts (1pt)
-
At least
3 Datums and 2 unique Feature Control Frames, on the appropriate toleranced
dimensions for the appropriate features or surfaces referring to the datums
(1pt), need to make sense, use your guidebook (1pt)
-
Note section
with fabrication details and Mass Properties (1pt)
-
Views
and annotations laid out with appropriate spacing and symmetry (1pt)
-
View titles
- Sheet Notes layer, CAPITALs, centered below and underlined (1pt)
-
Errors
and Extras
-
Exploded
assembly drawing of your FDP assembly, graded as follows 10 points total
-
Create
new isometric type view with a different orientation (if needed) to make
it more readable in a drawing (1pt), organized with edge and object offsets,
HLR, proper scale so that it fits but not too crowded (1pt)
-
Bill of
Materials, on the Sheet Notes layer, organized and neat, consistent
row height, rows in logical order, filled in, CAPITALs (1pt), numbers centered,
text left justify (1pt), Columns include and in order: Item Number, Description,
Material, Part Number and Quantity categories (1pt), get started on this,
does not have to be completely full.
-
Balloons,
circular split line for all parts, item number/quantity (1pt), organized,
easy to read, magnetic line, no overlapping lines, Sheet Notes layer (2pts)
-
Explode
Line Sketches, complete, neat, organized, no stacks, lots of clearance
(2pts) Get started on this, does not have to be complete.
-
Errors
and Extras
At
the end of the evlaution, provide the following items:
Printed
drawings complete after class, I leave at noon.
Send
pdf drawing files after class, before noon
Markup
at the instructor's podium
Weeks
9, 10 and 11 - Class Design Projects, This week we will be working more
with SolidWorks Drawings including Explode Configurations, Explode Drawing
Views, BOMs (Bill of Materials) and Balloons.
-
-
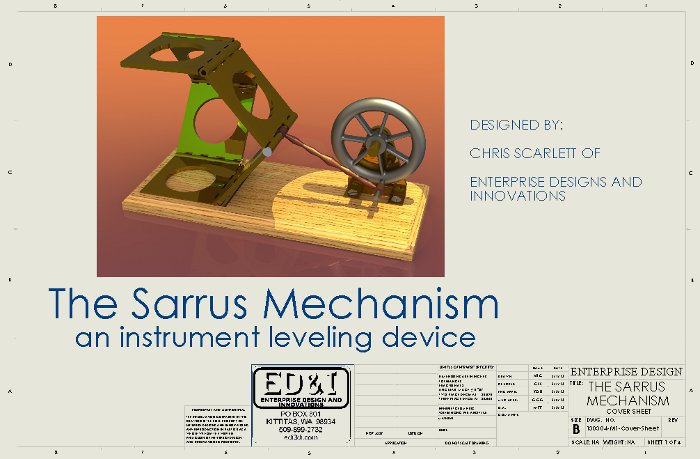
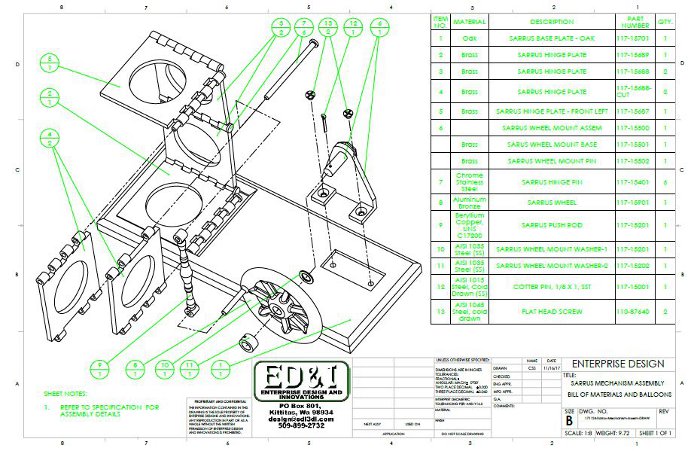
A sample drawing set for your
Week 11 WDE of your FDP. Cover page, assembly page with Exploded
View, Balloons and BOM and a part drawing with dimensioning and GD&T
items. Print per the specifications on the Student
Resources page.

The
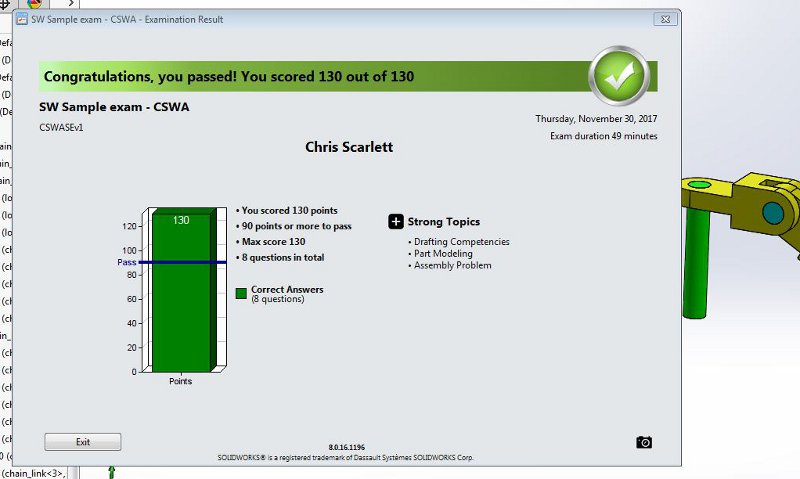
CSWA Sample Test - Everyone should be well prepared for this!
-
Week
11 Instructional Videos, click here
-
|
|
-
|
|
 |
|
-
| Finals
Week:
Information
on your Final Design Project - including information on your FDP score,
drawings, presentation and peer evaluation is available below.
|
-
Before
or during the time of the Final Presentation provide the following items:
-
Printed
drawings before the beginning of the presentations
-
Send pdf
drawing files before the beginning of presentations
-
Send FDP
Assembly "Pack and Go" zip file before the beginning of presentations
-
Send FDP
Drawing "Pack and Go" zip files (5 total zip files) before the beginning
of presentations
-
FDP Peer
Evaluation booklet at the end of presentations
|


-800px.jpg)
